
When emergencies strike, knowing how to perform infant CPR can mean the difference between life and death. For parents, caregivers, and anyone who spends time around babies, having this lifesaving skill is essential. Every year, thousands of infants experience cardiac emergencies, often due to choking, respiratory issues, or underlying medical conditions. In these critical moments, quick, informed action is crucial. That’s why this guide is designed to walk you through the steps of infant CPR, helping you understand when and how to act. Keep in mind, however, that this guide is educational. To be fully prepared, hands-on certification from a trusted provider like CPR Tampa is strongly recommended.
When to Perform Infant CPR
So, when should you perform CPR on an infant? It’s important to know the signs. If an infant is unresponsive, not breathing, or only gasping, they may need immediate CPR. Cardiac arrest in infants is often caused by respiratory failure, sudden trauma, or congenital heart conditions. In many cases, choking can lead to unconsciousness and cardiac arrest, but it’s important to distinguish between a choking incident and a full cardiac event. If the infant is conscious but can’t cough or cry, begin first aid for choking. If they become unresponsive, shift immediately to CPR. To assess responsiveness, gently tap the infant’s foot and call out loudly. If there’s no movement or sound, it’s time to act.
Before You Begin: Safety First
Before starting CPR, take a moment to ensure the scene is safe. You should not put yourself in danger. Once safety is confirmed, check the infant’s responsiveness again, and if there is no response, call 911 immediately. If you’re alone, perform CPR for about two minutes before making the call. For best results, place the infant on a firm, flat surface such as the floor or a table. Position them so that you can easily access the chest and airway without obstruction. Proper positioning and technique are vital to ensure CPR is effective and not harmful.
Step-by-Step Infant CPR Procedure
Checking for Responsiveness
To begin CPR, start by checking for breathing and a pulse. Use your fingers to feel for a pulse on the inside of the upper arm (the brachial artery). If there is no pulse or if the heart rate is under 60 beats per minute and the baby isn’t breathing properly, begin compressions.
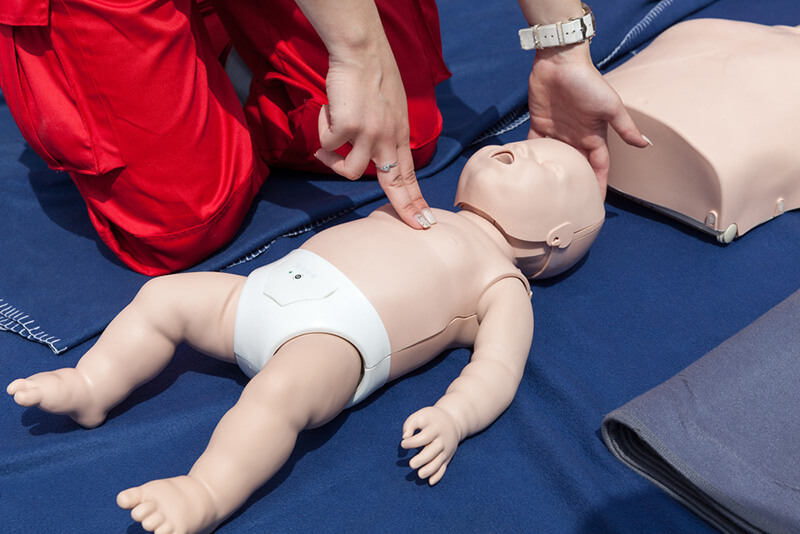
Proper hand Positioning
Use the two-finger technique: place two fingers in the center of the chest just below the nipple line.
Compression depth and rate
Compress the chest about 1.5 inches deep at a rate of 100 to 120 compressions per minute. Allow full chest recoil between each compression—this is essential for the heart to refill with blood. After 30 compressions, give two gentle rescue breaths. Cover the infant’s nose and mouth with your mouth and blow for about one second, watching for the chest to rise. Continue with the 30:2 ratio until help arrives or the baby begins to breathe.
Special Considerations for Infants
It’s important to remember that infant CPR is not the same as adult CPR. Infants are more fragile, and their bones and tissues require a much gentler touch. One of the most common mistakes is pressing too hard or too fast, which can cause injury or ineffective compressions. Always be mindful of your pressure and rhythm. Also, consider the age of the infant. For newborns (under one month), compressions may need to be slightly shallower and more delicate, while for older infants (up to one year), you can use the standard depth of 1.5 inches with proper technique.
What is “1-Rescuer Infant CPR”?
In situations where only one person is available to perform CPR—known as 1-rescuer infant CPR—the focus is on delivering high-quality compressions and breaths with as few interruptions as possible. It’s a physically demanding process, so it’s important to stay focused and consistent. If you’re alone, perform two minutes of CPR before leaving the infant to call 911. If a phone is available, use speakerphone so you can continue compressions while alerting emergency services. You’ll need to alternate between compressions and breaths yourself, aiming for the 30:2 ratio and only pausing briefly between cycles.
What About Two-Rescuer Infant CPR?
When two rescuers are present, infant CPR shifts to a 15:2 ratio—15 compressions followed by two breaths. This approach allows for higher-quality care, as one rescuer focuses on compressions while the other delivers breaths. To keep compressions effective, rescuers should switch roles every two minutes or sooner if fatigue sets in. Smooth coordination and communication are key in two-rescuer scenarios, which is why formal CPR training often includes team-based simulations to help participants learn to work efficiently together.
After CPR: What’s Next?
After CPR has been initiated, you may wonder when to stop. You should continue until emergency services arrive and take over, or until the infant begins breathing normally again. If the infant starts to breathe but remains unresponsive, place them in a recovery position—on their side with the head slightly tilted to maintain an open airway. It’s also important to recognize the emotional toll such situations can take. Caregivers may feel overwhelmed, scared, or guilty. Seeking emotional support after the event is not only healthy—it’s necessary.
Getting Properly Certified
To truly be prepared, there’s no substitute for hands-on certification. CPR Tampa offers American Heart Association-certified training in Basic Life Support (BLS), Pediatric Advanced Life Support (PALS), and more. These courses are designed to be stress-free, engaging, and practical, giving you the confidence to act decisively in real emergencies. Instructors guide you through real-world scenarios using infant manikins and CPR feedback devices, so you can practice until you get it right. You’ll leave class knowing exactly what to do—and why it works.
Conclusion
In conclusion, knowing how to perform infant CPR is an essential skill for parents, caregivers, and anyone who wants to be prepared to help in a life-threatening situation. From understanding the signs of cardiac arrest to mastering gentle but effective compressions, each step plays a vital role in giving an infant a fighting chance. While this guide offers valuable insight, the best way to prepare is through formal training. Being CPR-certified offers peace of mind, knowing you’re ready to step in when every second counts.
To learn more about infant CPR, current American Heart Association guidelines, or to register for an upcoming class, visit CPR Tampa. Whether you’re a healthcare professional or a new parent, we’re here to help you become a confident, capable responder. For class schedules, certification options, or to ask questions, don’t hesitate to contact us directly. Let CPR Tampa help you turn knowledge into action—and action into lifesaving results.